Showing posts with label tutorials. Show all posts

Thursday, May 31, 2012

From Straight Skirt to Pencil or A-Line

During the past year I've had a few requests for Pencil Skirts, so I thought I'd show you how easy it is to make it a pencil using any straight skirt pattern. Because both rely on a tiny paper hinge, I'll show you how to make one type of A-line style too.


Step 1: Start with any straight skirt pattern that you like. What's a straight Skirt? One that is the same width at the hem as it is at the hip.

I like the two/four dart front because it fits the body much better than the one/two dart front.


Step 2a: Using a ruler, draw a line at the seam allowance (red line). The seam allowance will become your pivot point, so you need to know where that is.

Step 2b: Draw a cut line that angles from the hip and pivots to parallel the seam line (blue line).

Now we are ready to make our pattern into an A-line or a Pencil skirt.


First, the A-line style. An A-line skirt is wider at the hem than it is at the hip.

Starting at the hem (bottom), cut into your pattern, following your cut line, up to, but not through the seam line. From the other side, cut into the seam allowance to the seam line leaving a tiny paper hinge.


Put paper under the pattern and pivot the side seam outward, up to 2 1/2". Tape in place on both sides of the cut line.

Repeat this same procedure for the back pattern.


 Next, the Pencil style. A Pencil skirt, sometimes called a "Pegged" skirt, is narrower at the hem than it is at the hip.


Instead of outward, pivot the side seam inward, overlapping the cut edges. How much to taper or overlap is a matter of preference, but just remember that you still need to be able to walk!

Remember the Hobble skirt from before WWI?  Well, tape your pattern in place, and of course repeat this procedure for the back pattern, then you can watch how these lovely ladies manage a narrow skirt with tiny dainty steps!


Thursday, March 15, 2012

Tutorial: switching from darts to elastic at the waist.

Several years ago I had a student in my fitting class that complained bitterly about a figure "flaw" she called a  "bubble butt." I thought it a pretty good description for the figure type that also belongs to me. Because clothing for the masses do not accommodate a generous back bumper, I knew first hand the difficulty she was experiencing. She asked me "How do YOU deal with this?"  My rule number 1: I do not ever wear elastic, or anything for that matter, that is not fitted with darts at the waist. The one exception is garments made from knits. A soft and drapey fabric won't pooch out like an umbrella, over, above, below my waist. But not everyone needs darts the way that I do, so who can get away with elastic? Kids!... And others who have a tubular figure, with waist and hips that are of similar shape and measurement, a flat rear, or are wider at the waist than at the hip.

I would venture to say that you will never see me designing a style with an elastic waist, just because everyone can wear some version of a dart, but not everyone should use elastic. If you are one of the lucky ones to be ambidextrous, or prefer to make and wear elastic, fear not: it's incredibly easy to turn darts into an elastic waist, but not so easy to do the opposite. In 5 easy steps, here's how: (click on the photo to see a larger view)


That's it! You can use this same procedure for almost any fitted garment. Questions about that? just ask!

Tuesday, November 29, 2011

Copy your Figure: A Dressform Tutorial part 2

Part 2 of this tutorial shows how to remove the wearing ease from your cover and shaping it for an exact duplicate of  your figure.
Here is a listing of all three parts:


Step One: Prepare for the Fitting

1. Plan to do this on a day when you are feeling good and have a good sewing friend handy. This is not a job you can do alone, nor can I over emphasize its importance. Don't ask your husband to fill in when he has no idea or interest in what you are trying to accomplish. Even working quickly with someone who knows what they are doing, expect it to take 2-4 hours from start to finish.

2.Wear a good well-fitting supportive bra. In fact, buy a new bra just for this occasion. Having made custom wedding gowns for many, many years, this is the one thing that 100% of my clients had in common. You want this mannequin to be the most attractive copy of your figure that you can give it. Besides, a droopy bust is really hard to copy.

3. Wear all of the same undergarments that you normally do. If you usually wear a girdle, or other supportive/ medical needs types of undergarments, do your fitting with those on as well. It's okay to wear a full body leotard as my model did- for modesty.

Step Two: Pin it up Tight as a Drum

Pinning the back
1. Put the cover on, with seams outward, pinning closed at the side seams and back at seam lines.
2. Make a determination on how and where to take away the wearing ease to make the cover completely form fitting. If the original pattern was fitted to your figure before attempting this project, the wearing ease for width will be almost evenly distributed throughout. There should be a small amount of ease for height as well. I wish I could say to start with the width and then take out the height, but it's not quite that simple. The main thing to keep in mind is to maintain an even waistline, parallel to the floor, and keep all seams centered and vertical.  

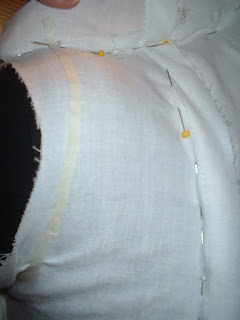
Pinning out the ease at the princess seam
Pinning under the bust for an exact shape

cleavage darts at center front
 3. Pin out the dart space between the breasts, creating a made-for-you cleavage. You may also need to add a dart in the back near the scapula, angling into the arm hole to accommodate the curve of the back.

Pinning the front
4. Continually evaluate. Look for ripples and drag lines that need to be stretched and pinned out.


Pinning the shoulder and marking the armscye


5.. After everything is snug and firm, the last thing to do is mark the armscye and the neckline. I used 1/4" masking tape (available in the quilting section of your fabric store) because I could visually see it better, remove and reposition it if necessary.

6. Mark the back seam line on both sides with a pencil or marker and then remove the cover.

Step Three: Mark the Seam Lines
 All those pin lines now need to be marked and transferred to the pattern. Transferring the new markings to your cover pattern are optional, but what if you needed to make a new cover for your mannequin? What are the options?
- Go through this fitting process and re-pad your mannequin again. 
- Remove the cover and cut a new one from the original. 
- Use the old one no matter the condition.
I recommend it, but if you'd rather do it the quick and dirty way, go ahead and sew up the cover using the pins as your seam line guides and call it done.If you want to transfer your new seam lines to your pattern, and perfect your cover to make sure that both sides will be the same, then read on:

1. With a pencil, mark the pin lines on the cover just as you made them. Don't worry that they might be crooked or angled. I did mine like a dash, marking exactly over the pin.

Mark the corrected seam line with a colored pencil
2. To copy the new seam lines to the pattern, take the cover apart by removing the stitches. Now you have two sides, both marked, and neither are exactly the same. You'll have to evaluate both and decide which will be more accurate, or if you need to use a combination of both. Granted, this is not an easy task, nor is one right and the other wrong, but each will have its own consequences. Any education and experience you have will help you, but all the same, this is a decision that you must make.

3. Having the new markings visible, pin the pattern and cover back together. Use a tracing wheel to trace along the new seam lines, perforating the paper below.

3. Remove the cover from the pattern and remark the pattern seam lines following the perforation. I also reduced my seam allowance to 3/8" along many, but not all seam lines.


Mark the new seam lines and reduce the cut line

If you like, this is the time to mathematically check the dimensions. My darts, which were originally straight, are now changed to a curve to match the body's shape.

Straight darts are now curved

4. Press out the original cover fabric, putting like pattern parts together, and re-pin the newly adjusted pattern to it, cutting to the new adjusted size. Sew it together once again, leaving the center back open.

  Step Four: Time for a Second Fitting

1. I decided it was best to do a second fitting just to be sure that everything was perfect. This fitting went much quicker. Wear the same under clothing as last time.

There were only a few adjustments needed. 


My model didn't leave her bra on, so I ignored the bust area and made no changes there.


Again, make these changes to your pattern and cover. 
It may help you to take photos of yourself pinned into your cover, both front, back and also a side view. This could help to make a duplicate of yourself in Part 3 of this tutorial: Padding out the mannequin.

Tuesday, May 4, 2010

The anatomy of a waistline


With the internet, who needs an encyclopedia anymore? I'm always looking for information on the internet. We have a whole world of people sharing with each other, so some of it has to be good, but some estimations put less than half as solid and true. I once tried to find a video tutorial on how to accurately measure yourself for a pattern. One video suggested I should choose a waistline location where ever I thought best. Hummmm...Really? I guess I didn't need a video after all!

Webster defines a waist as: "the typically narrowed part of the body between the thorax and hip." Okay, so it's typically narrowed, but not always, so that's what throws everyone off (that and low rise jeans!). The real answer is in the last part of the description. Your waist is actually an anatomical place we can point to! I ask my students to feel for that place between the hip bone (pelvic girdle) and the rib cage. This is the place where your body can bend because it's not encased in bone. Your body is unique to you, so that space can be rather long, especially if you are tall, and other times it's extremely narrow. If you still have trouble finding it, feel along the bottom rib to your side where the bone and rib come the closest. It is at this defined point, all the way around and parallel to the ground that is your waistline!

Thursday, December 10, 2009

Burdastyle

Have you found out about Burdastyle yet? So many American sewists have complained about Burda patterns because they weren't in inches and at one point in time didn't add seam allowances for you (I'm told that now they do). I can see how some might not want to try it, because I also avoided those patterns in my younger years. But now, I'm okay with it, in fact I see the wisdom in it. Metric IS easier, and changing design lines or seam lines, and measuring the pattern for fit are so much easier when you don't have a seam allowance to contend with. And European style is so much more interesting to me now. Since I don't sew much but my own patterns these days, I can't really comment on Burda patterns themselves, but I do like their pattern styles, and they have a great website: http://www.burdastyle.com/


It's like one big sewing party where everyone is invited to comment, add their own patterns (many are free), write sewing tutorials, or have a discussion about anything at all. Of course, use good judgement when gleaning information because not all is worth your trouble, but I've found some good instructions on constructing your own basic block pattern, and I link to it from my website on the tips and techniques page. All in all, Burda has done a great great job with their website giving creative people a place to get together and share. I'd be willing to bet their patterns are of the same quality.