

Before I dig into the meat of the "how tos" I want to go into what type of pattern would need a gusset.
"Hi Laura, ...My question is: Does a gusset benefit every garment? Why do some garments such as the portrait blouse have a gusset while others do not." -Laura K.
ANSWER: The
whole point of a gusset is to improve arm movement, and there are
several factors that
will be considered and as you might guess, all of
them relate to the design of the sleeve. A cut-on sleeve ( a one-piece
bodice and sleeve - often called a kimono sleeve) is generally the type
of sleeve than needs a gusset, especially if the sleeve is fitted and the sleeve tilts down at
the shoulder (such as the portrait blouse). Without a gusset, you could
not lift your arm without pulling the whole thing up. Gussets adds fabric
under the arm pit and allows the arm to move freely without pulling up the blouse.
Though I'll be using using Sew Chic Patterns LN1619 Portrait Blouse, this tutorial will apply similarly to any pattern with a gusset, or one that needs a gusset.
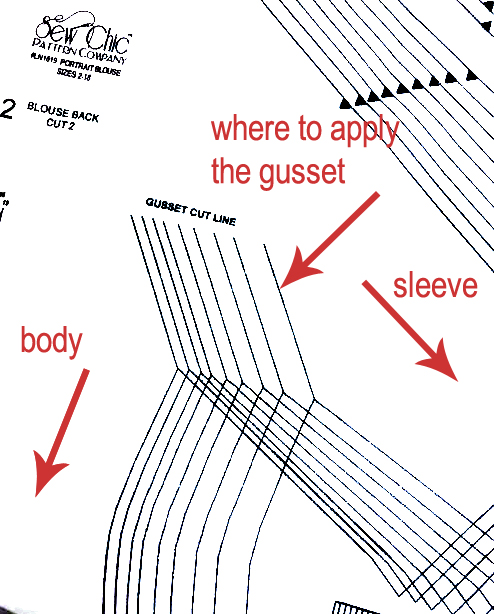
Your pattern will look something like this one where the body and sleeve of the garment are all one piece. You'll cut according to your size needs, and there will be a gusset line marking where the gusset should be sewn. It should point to the neckline.

During the layout stage, I must emphasize DO NOT CUT ON THE GUSSET LINE at this point, but DO mark the line on the wrong side of the fabric with your dressmakers carbon.

After marking, the end of the gusset line will need a bit of fusible interfacing. The heavier the better. You will be sewing really close to the raw edge and there won't be much of an allowance. Interfacing helps to keep that end stable and supported. I know you are going to ask me which kind of interfacing, so I recommend fusible woven or knit. Make sure to fuse it tightly to the fabric! Heat and steam do this.

The first "sewing" step is to mark the seam lines. I use a ruler and a chalk marker. The seam allowance is 1/4" where it crosses the garment seam line, tapering to nothing at the tip. It should look like a "V" with your original marked line running down the center.

Stitch, following the marked seam line. This is called "stay stitching." Use a standard or narrow stitch, especially at the tip to really support that narrow edge.

Now cut down the center along the "gusset" line.

Cut right the tip as far as you dare. If you don't cut far enough, it will cause puckering and this next step will be difficult to do.

If you haven't marked the seam allowance on your gusset, do that now. Correct any cutting misalignment. An accurate seam line here will produce a perfect fit to the bodice.

Pin one side only, seam line to seam line as marked, joining the corner of the gusset to the corner of the gusset line stitching. The bodice will taper to almost nothing at that corner, but it can't be nothing, or the two pieces wouldn't stay together.


Reposition the fabric to align the seams and pin if needed. Make sure the fabric has been twisted to fit and doesn't have any bulk or bunching underneath. Lift the fabrics, as they can get caught on the feed dogs- make sure they are truly straight and aligned, then lower the foot and stitch down the other side.

Press seams toward the bodice. This gusset is complete. I do serge this seam after sewing and use a product called Fray Check to seal that tiny seam allowance on the bodice side.