Showing posts with label pattern variation. Show all posts

Friday, May 13, 2016

Pattern Hack Tutorial:The Ehlen Blouse


Next month is "Indie Pattern Month" over at The Monthly Stitch. This will be my second year participating in the June month long Indie Celebration. This year I'm sponsoring TWO contests-
  • One Pattern Two Ways
  • Hack It 
Prizes are many, sales are huge, and we've all pitched in a pattern or two for a PDF bundle sale that is listed as " up to 40% off" but in actuality, much more than that. HUGE discounts.

 Get the details about Indie Pattern Month here:

https://themonthlystitch.wordpress.com/indie-pattern-month-2016/


 With the sponsorship I was inspired to share a tutorial on this Ehlen blouse variation. I made this outfit for the IPCA fashion show for the International Textile Expo, an industry buyers event. The point of the fashion show is to use vendor fabrics and provide buyers with ideas and inspiration. I think it turned out nice.

  As written, the pattern recommends a  medium weight fabric and is entirely lined and trimmed with lace or piping.

In my hack,  I used lining and chiffon layered together, each piece basted inside the seam allowance and treated together as one and trimmed with binding. It's very light weight, and using the methods I will show you, it's much quicker to assemble too. I enjoyed playing with the contrast of the shiny lining and the dullness of the chiffon. The bow can be wrapped and tied in the front or back depending on where you want the drama!

1.Cut one layout each of lining and chiffon. Additionally, cut about a yard of 2 1/4" wide bias from the lining fabric. Fold in half lengthwise, with wrong sides and raw edges together, press. The ties are two 6" strips the full width of the fabric (45" -60"), or as long as you want them.

2. Pin lining to the chiffon and baste the perimeter of each piece just inside the seam allowance.

3. Follow instruction booklet, sewing back to front at shoulder as pictured.


 4. Sew a stay stitch around the neckline, at 1/2". Trim neckline seam to 3/8", or 1/4" from your stitching.


 5. With bias binding to wrong side of neckline, raw edges together, sew bias to neck edge. * Because this is a long seam to sew, I did it in two steps. The first row of stitching is 1/2", over stay stitching, and I'm not trying to be too precise. I just want to get it attached. The second  row of stitching is measured from the bias FOLD LINE. I want my binding to fold over to an exact width of 3/8", so I am going to sew 3/4" from the bias fold line to get that exact width.
 6. Trim again and clip in a "v" configuration. This allows the neckline to move and bend without puckering. Press binding to the inside.
 7. Fold bias to front, matching fold to seam. Top stitch close to fold. When I say, close, I mean a SCANT distance, which is to say it's next to almost nothing. Turn your computerized machine to slow if you need to.
 8. Trim the binding to match the front raw edges then sew the center front per instruction booklet.


9. This is the sleeve at the peek-a-boo opening. Following the same procedure for both the front and back sleeve, finish this opening with binding .Sew wrong sides to wrong sides.
Trim, press, and topstitch. 


Here's a helpful tip for sewing accurate curves on those sleeve bands. I make a template cut from my pattern and then trim the seam allowances off. put on my edge and with air erasable pen, draw in my stitching line. It helps to have something to follow!
10. For the ties, along one long edge, sew a clean finish (folded at 5/8" and inside the allowance again at 1/4" and sew close to fold) along one edge, fold up creating a diagonal as shown. Sew together at 5/8". Turn right sides out and press.

11. Clean finish the opposite side. Run that top stitching from the square end, to the point end.
Hummmm...why is this one upside down?? Well, you can see the whole tie here.
12. Sew two rows of basting on the short square end, gather it up, and pin to blouse front at waist, about 3" wide when finished.

13. Sew to side seam.

14. Finish up the garment as needed per instruction booklet, omitting the lining as a finish. I hemmed my blouse with a clean finish too. It's such a tidy sewing method!


FINISHED!

Get your pattern here:
http://www.sewchicpatterns.com/ehlen.html

I hope this inspires you to join the sewing contests.

Happy Indie Pattern Month!


Tuesday, September 22, 2015

Tutorial: Easy Ginseng Sash Variation

Sew Chic Pattern Co. Ginseng LN1516
Laura Nash wears Ginseng #LN1516


I like variations. I don' t know about you, but I'm not the type to buy 10 of the same T-shirt, or wear my clothes and matching accessories exactly the same way every time. Maybe that's because I can't remember how or with what I wore it! Even if I like the combination a whole lot, I still can't seem to remember. This can be a problem if I want to dress in a hurry....but on the bright side, I guess this means new ideas are always ready to spill out. So here is another spillage born out of my love for variation!


Those ties do elongate and make us look taller, but why not change it up and turn those long ties into a bow?

Here's how:


 Starting with the wider bottom sash, folding in thirds, fold under to meet the waist.


 Now fold the top sash in the same way.


Pinch together turning each section to opposite sides. The smaller sash moves up and outward and the larger tie turns down and toward dress center, giving it a diagonal angle. Adjust so your fingers straddle three sides with the gathering in the center.


Find your prettiest piece of jewelry with a pinning mechanism on the back and pin it all into place.


My pin does not hold all of the gathers, only bits here and there, enough to keep in tacked down and in place on the surface.


Sew Chic Pattern Co. Ginseng LN1516
Sew Chic Ginseng #LN1516
Here I look as short as I really am (no illusions to help me!), but that's okay because I like the bow and a reason to wear sparkly jewelry is never a bad thing. I can do the elongation another day! What variations can you think of for those sashes? Share with me!

Buy the pattern here: ♥
http://www.sewchicpatterns.com/ginseng.html


Have a great sewing day!

Laura

Tuesday, August 25, 2015

Sewing Pattern Variations: Pendleton Dress


One of the many things I love about sewing is the customization. We all get more value from our patterns when we can change it up and make them more than once. What girl can’t use a few extra outfits?! 

However, the pattern cover can be deceiving. With limited time and space - and to keep it to the point (but cute and appealing) - we must choose only a few "looks" to show it off. 

Ideas don't spring from nowhere, so a few more photos really helps. You may have seen these before ;-)
VIEW A in Chambray and Pique
VIEW A in Houndstooth and Velveteen


VIEW B in a cotton floral print

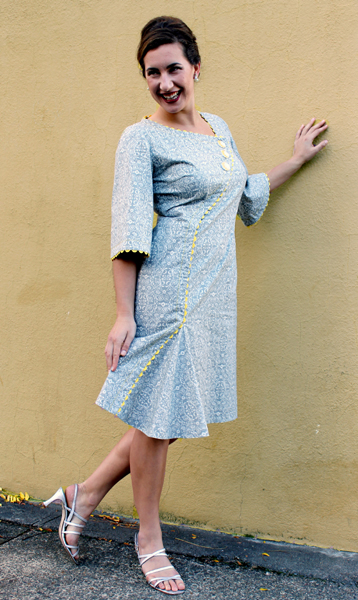
Today I'm sharing a Pendleton variation that is casual and fun, something more than the straight-up version on the package. None of these options require altering the pattern or any special skills, but hopefully it will get you thinking about your own variations.


The changes I made:
  •  3 buttons following the front instead of a bow
  •  rick rack versus piping
  • omit the elastic from the bell sleeve (add a facing)
  • back zipper instead of side zipper

My fabric is a comfortable (pre-washed) cotton that is a bit thicker than the other versions shown above. This is great for the bell sleeve because it helps hold the pretty shape and gives a little more structure to the dress too. 


My adventure got started with the gray fabric in my stash of course, but the fun didn't get started until I found these adorable buttons a the store. They deserve to be a focal point.

 The rick rack came next. There are three widths of rick-rack, and this one is the Jumbo size. Centering the rick rack down the seam allowance is made easier by basting the seam on the dress first. The thread leaves a trail to follow so to speak. Lift the rick rack at intervals to center it along the basting while basting to the dress. This photo shows the finished front.

 Making View B without the collar, there is the option of changing the zipper from the side seam to the center back. Simply mark the zipper length on your dress and sew a centered zipper instead of a lapped zipper.


Leave out the elastic on the View B sleeve and it takes on the lovely bell shape. To add the rick rack to the sleeve edge, I needed to make a facing of course, and then top stitched everything in place with the top stitching thread to add the same dash of color. Use top stitching thread for the upper spool only. I use standard thread for the bobbin. You may need to play with the tension a little bit too.
From cute to colorized in 4 easy steps. What do you think?  Shop for this pattern here:
http://www.sewchicpatterns.com/pendleton.html

Have a great sewing day!


Monday, May 18, 2015

Pattern Tutorial: Fantasia Dress Variation

Fantasia Variation - how to go from the Opera to the Office

I love the Fantasia dress pattern with a fitted bodice and flared high-low skirt- words like formal, feminine, cultured, clean, classic and bridal come to mind. All my designs are fairly girly- but recently I had to rethink that concept when I approached a wholesale fabric vendor from the International Textiles Expo who was interested in collaboration. She was to send me fabrics for a blouse and skirt from my pattern collection and we would represent each other at the fashion show and market. I love teaming up!

Then the fabrics came -- a pinstriped navy and blue/gray suiting. The tweed, as our vendor called it (it's not an obvious tweed weave) was soft and thick with the right amount of body and the shirting was crisp and tightly woven. They washed up beautifully and high quality fabrics are always a dream to work with, but....it was a little on the "manly" side. Hmmm. Would this work for a girly twirly skirt? I looked at my patterns and nothing seemed quite right until finally the thought came to me: combine these two fabrics with the Fantasia dress, then complete the look with the Victory Jacket and voila! I've got the suit style that this fabric needs. This outfit has a definite 1940s vibe, and made for fall, this combination will definitely be one of my season favorites.

I chose the low-calf length, view B, but for a formal event, the longer length (view A) would look fabulous too. For this blouse and skirt look-a-like, I used the tweed for the skirt and jacket and the contrasting navy fabric for the dress bodice. It looks like a skirt and blouse, and because it won't come un-tucked, it wears even better!
 
The fabric completely changed the look of Fantasia and is an easy way to move into the look of a suit without all the typical tailoring. When cutting out the pattern, I simply used the navy pinstripe for the bodice and sleeve pieces and tweed for everything else.


I decided to switch out the cap sleeve for a longer length. I used the sleeve from Beatrice and shortened it to just above the elbow, which is about 6-6 1/2" from the underarm, finished. Rather than using the sleeve facing, I turned up the bottom 1" and did a blind hem on the sleeve (the alteration means the facing wouldn't fit anymore anyway!). Other than that, the dress has no other variation.

The gray tweed was used for the skirt section, and to transition the two fabrics, I added in a 2" wide covered belt.

To make the belt, follow the tutorial I did for the Sew Mama Sew blog called "Made to Match." Find that tutorial here:
http://www.sewmamasew.com/2013/10/made-to-match-belt-tutorial-from-laura-nash-of-the-sew-chic-pattern-company/


To further separate the identities of the top and bottom, I finished the skirt seams  by pressing open, turning under 1/4", and top stitching through all layers about 3/8" to the right and left of every vertical seam. The bodice seams were serged. See the next photos for a view of the skirt seam.
These pictures shows the "V" detail in the skirt "train" where it attaches at center back.

This photo shows the inside finish of the skirt seams turned under and stitched. To emphasize the lovely flares and help  it keep structure under the weight of this suiting fabric, I tucked a 1/2" wide horsehair braid down into that hem allowance and topstitched everything into place in one step.
 

The Victory Jacket was made as is outlined in the instruction booklet with only one variation...


I turned back the front from the side of the neck, parallel to center front and tacked it with a flat 5/8" covered button.
This dress is soft and comfortable to wear and oh so pretty. What do you think of the new Fantasia suit look?
Buy the Fantasia pattern here: http://www.sewchicpatterns.com/fantasia.html
Buy the Victory Jacket pattern here: http://www.sewchicpatterns.com/victory.html

Have a great sewing day!
Laura