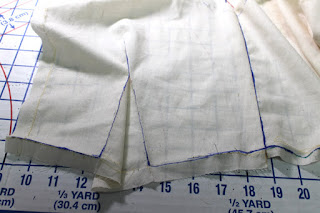
1. After your fittings are complete, mark ALL seams, both changed and unchanged. I find that a fine tip permanent marker does a great job because one line down the seam marks both sides for me.
2. Remove all the stitches, darts, seams, everything.
3. Press all pieces flat.
4. Assuming that your pattern is made of transparent paper, lay the paper pattern over the fabric piece. Match up the fabric seam lines that have not changed with your paper pattern seam lines.
5. Here you can see the changes more clearly. The blue mark is the changes on the fabric while the pencil mark is the pattern original. If you are ever left wondering whether to make a change to the paper pattern, remember that the fabric marking always takes priority over the paper marking because the fabric has been tried and proven to fit.
6. Now I need to mark the change with a colored pencil. This helps me to remember where I changed the pattern from the original. I can also keep the original mark to refer back to it if needed.
Here is the change shown clearly.
7. For seams, I must also correct and create a new cutting line. I blend my new line into the old line. You may also need to "true" corrected line. In other words, make sure that your new lines are smooth and straight (or nicely curved), and blended into your original line. I can also put slash marks through the original line to remind me that I don't want to use it. It's an extra assurance.
That's it. Now your pattern is ready to use again!


This is such useful information. Thank you for sharing!
ReplyDeleteThanks for the tip on how you use permanent markers to mark seam lines.
ReplyDeleteAmazing tuto! oh thanks! I'm working in my first skirt pencil draft and this is really useful.
ReplyDelete