Showing posts with label fitting. Show all posts

Wednesday, June 21, 2017

WEEK 3: Alternative Method to Move Darts or Shorten Bodice

For this sew along, I am working with a small group of folks on a special group page I've set up for this purpose. Each are at a different level of skill, but each have committed to doing the assigned homework for the maximum educational experience. It's easy to sit back and let me do all the work, so I'm grateful to have such a committed group!

While I work with them on their individual projects in the group to get them caught up, I thought I would share with you my fit experience as I worked through the 10 steps from the last post.

There are TWO main things that will ensure an easy start on the road to fit:
  • Choose the right size for each area of your body. 
  • Sew an accurate seam allowance. Do a test with your sewing machine guide and then measure.   
I asked my larger sewing group what size I should make for my padded out dress form. The answers I got surprised me. What size do you say?  (see my size chart here)

I need to do a post on this subject, but that will have to wait until another day...


 Here is my dress form from the side (left). My pattern FBA adjustments have been completed, and I wanted to show you the pattern pieces and how they mimic the shape of the dress form. If the figure had more below the bust tummy fat, I could straighten that princess line (as represented by the pink line).

What I discovered from the tissue fit step (step 10 on last weeks post)
http://sewchicpatterns.blogspot.com/2017/06/week-2-getting-right-start-with-fitting.html 
  is that my dress form has a very high bust and I need to shorten my bodice above the bust. This is a VERY unusual adjustment and can cause some trouble for the princess seam. To avoid more pattern troubles, I'm going to use  this  alternative sliding method to shorten my bodice without causing more trouble with the princess line. It comes in handy to accurately move or shift darts and design details that are in cumbersome areas.
1. Square off the armhole area, marking below and again amount to shorten below the armscye. Mine will be shortened 1". Line should be parallel to the grain. 
2. Cut into pattern and fold, matching previously marked lines. Secure with tape or pins as desired.

Your pattern should look like the photo above once taped.
  2. True seam and cut lines. I'm going to take out some of that under bust curve to keep the bodice from becoming to busty.
  3. Walk seam lines to find a similar shorten location on Bodice Front. Mark.
Ready to fold and match lines
4. Match lines and secure with tape. True the seam and cut lines.
5. Re-test your pattern work by pinning bodice to do a second tissue fit.
Looks much better now!


Monday, May 22, 2017

The Ultimate Sewing Quest: The Fit and Design Sew Along

There are two general problems that all stitchers have. The first is the hassle of fitting a pattern that wasn't made to fit your body and the second is finding pattern styles that give you just the right silhouette and design details that will make you fall in love and excited to make and wear it.


With that in mind, I've scheduled a Fantasia Fit & Design Sew Along for the month of June. Yes, I know that summers are so busy, but when aren't we all busy?? I chose the Fantasia because it's a fantastic base for so many other creative ideas. Be aware that I am not going through the full assembly of this dress, just the fitting alterations and how to make design changes to that base. Once you get a pattern that fits, any change you make to that pattern should fit you just as well.

I've dedicated a facebook group and pinterest page to compliment and get the most from the FFandD sew along. I'm asking that everyone do some homework and post photos as we go along so you can be assured of success. The Sew Along begin June 6. The schedule is posted to the group page.


Buy your pattern here:
http://www.sewchicpatterns.com/fantasia.html

I hope to see you there!

Saturday, January 12, 2013

Darts in Clothing that hit the Bullseye


This morning I gave a presentation to my local group of American Sewing Guild members. I'm sure you'd like a picture of it, but I can never remember to take photos of the (interesting?) things I do when I'm out and about. I forgot again. Anyway, the topic was darts.

To get us off on the right track, here is a quiz for you. A dart is widely understood to be:


A) The stinger of an insect.

B) A game in which small, slender, pointed missiles are thrown at a target.
 
C) A sudden, rapid movement.
 
D) A fold sewn into fabric to help provide a three-dimensional shape to a garment.


Though I have moved quickly to avoid being stung by a bee while attempting to hit a target with a small slender missile, I am really best qualified to speak on the three-dimensional fabric type, which I think are largely misunderstood. Here are the basics:

See how nicely those imitation darts (dotted lines) fit so well into the curves of our lady? The main point I would like to make about darts is that 1) the type, shape, length and width need to be personalized. One dart cannot be all things for all people. It can be for some, but not all. Let's see how those lovely darts look on someone of a different figure type:
You see what I mean- Not such a good match up.

The next thing to keep in mind is that a dart should never be longer than the apex of the curve it will be fitting.

So, what happens when a dart is too big? You'll end up with a big poof or bulge where you don't need it, as in the Sewing Lawyers experience with Vogue 1324.

The photo I want you to see:

https://blogger.googleusercontent.com/img/b/R29vZ2xl/AVvXsEgrtBBPD0HxZ15zcq34WHRRcNMl_hzulX3sPh2WSvizaqfU9dCjoxX1Yiuadws2p2Cuc9WN6HRTIckWpjDN36YIrgrxHEnmKjLI4CcYB2AP8gJima8HJrddYKEy_Av_zugJ5z-fEzqgZm4/s320/IMG_1002.JPG

The whole blog post: http://kaythesewinglawyer.blogspot.ca/2012/09/fits-and-starts.html

Okay, but how to fix it? Make the dart smaller (draw in a smaller dart, and not so long) and then take another avenue to reduce the now too large waist.

So What happens if a dart is too small?  You'll see drag lines and/or pulling, but be careful because the cause may not be the darts at all. You might think these draglines point to a need for a full bust adjustment as with Kadiddlehopper when she made Sew Chic 7401:

https://blogger.googleusercontent.com/img/b/R29vZ2xl/AVvXsEh8-UCXdTMKzTyWUug_S2eSuHY2-wNzk2VrE_CJudErESgOyNn-IFQ-t2F6qwzg-5NM3GjKLdfukOZR8I9iiIQCupaBpERb8wLAqvjmzWb2-v1V5zHBUCKTmyMuGUalRDB8D7PaRdJ3i9A/s320/IMG_5478.JPG        

The right solution to this problem may surprise you. Read about it on her blog here:

http://katiekadiddlehopper.blogspot.com/search?q=myrtlewood#!/2010/01/myrtlewood-muslin.html 

Sometimes a pattern comes without any darts when it really needs one. Read about our experience with Butterick 5601.

http://www.sewchicpatterns.blogspot.com/2012/11/when-dart-will-do.html

I challenge you to look for new ways to use darts for fitting. Of course they can be both friend and foe, but when used right, they work wonders!


Sunday, November 18, 2012

When a dart will do.

Not long ago, high school girls everywhere were thinking about what to wear to the homecoming dance. My exchange daughter, Mirjam, chose Butterick 5601, a classic sheath with a key hole back. We left the store with black crepe and just a little trim for the waist. Then I get a phone call from my aunt who was making a dress for her granddaughter. She had some questions about how to sew with lace, and as the conversation rolled along, I realized that she was making the same pattern! We laughed and compared notes about the style and fit. She warned me that the skirt was very short, and I mentioned to her that the back yoke was missing some darts. 
What? Missing darts? She noticed the sag, but didn't know what to do for it except tuck it into the seam below. Not the best solution. Anywhere our body has curves, we need a dart to shape that curve, and our shoulder (blade) is one such curve.
Notice how that saggy look goes away once I put in the dart that has been omitted? SO much better. Next I need to correct the pattern, adding in the dart. This helps make sure the two darts are marked the same and if anyone ever makes this pattern again they will know to put in a dart here.
Here's what the pattern looks like now.

Mirjam and I worked on this dress every day after she came home from school for a week. She would press and I would sew. We were quite the sewing team! In the end, we also made some styling changes, adding a unique rhinestone zipper to the back of the dress that could have been a disaster but turned out to be quite dazzling. Stay tuned! Next week I'll show you what we did and how we did it...and the finished dress.

Saturday, November 3, 2012

Pattern Alterations after Fitting a Muslin

To test the fit of a pattern, sometimes it's wise to make a "muslin" or a sample of your pattern in inexpensive fabric. Cotton muslin is the least expensive of all fabrics, thus the name given to a garment made just for fitting. First make sure the pattern size you picked is right for your measurements. If not, check out my Pattern Resizing Tutorials, Part 1: Small to Large or Part 2: Large to Small. If you make a muslin to make sure your garment fits perfectly, you must also be able to transfer your fitting changes from fabric back to the paper. Here's how to do this, step by step:

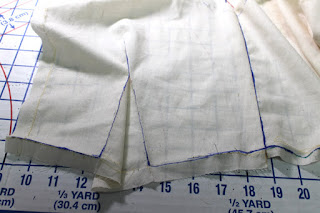
1. After your fittings are complete, mark ALL seams, both changed and unchanged. I find that a fine tip permanent marker does a great job because one line down the seam marks both sides for me.

2. Remove all the stitches, darts, seams, everything.
3. Press all pieces flat.
4. Assuming that your pattern is  made of transparent paper, lay the paper pattern over the fabric piece. Match up the fabric seam lines that have not changed with your paper pattern seam lines.
5. Here you can see the changes more clearly. The blue mark is the changes on the fabric while the pencil mark is the pattern original. If you are ever left wondering whether to make a change to the paper pattern, remember that the fabric marking always takes priority over the paper marking because the fabric has been tried and proven to fit.
 6. Now I need to mark the change with a colored pencil. This helps me to remember where I changed the pattern from the original. I can also keep the original mark to refer back to it if needed.
 Here is the change shown clearly.
 7. For seams, I must also correct and create a new cutting line. I blend my new line into the old line. You may also need to "true" corrected line. In other words, make sure that your new lines are smooth and straight (or nicely curved), and blended into your original line. I can also put slash marks through the original line to remind me that I don't want to use it. It's an extra assurance.
 That's it. Now your pattern is ready to use again!


Thursday, March 15, 2012

Tutorial: switching from darts to elastic at the waist.

Several years ago I had a student in my fitting class that complained bitterly about a figure "flaw" she called a  "bubble butt." I thought it a pretty good description for the figure type that also belongs to me. Because clothing for the masses do not accommodate a generous back bumper, I knew first hand the difficulty she was experiencing. She asked me "How do YOU deal with this?"  My rule number 1: I do not ever wear elastic, or anything for that matter, that is not fitted with darts at the waist. The one exception is garments made from knits. A soft and drapey fabric won't pooch out like an umbrella, over, above, below my waist. But not everyone needs darts the way that I do, so who can get away with elastic? Kids!... And others who have a tubular figure, with waist and hips that are of similar shape and measurement, a flat rear, or are wider at the waist than at the hip.

I would venture to say that you will never see me designing a style with an elastic waist, just because everyone can wear some version of a dart, but not everyone should use elastic. If you are one of the lucky ones to be ambidextrous, or prefer to make and wear elastic, fear not: it's incredibly easy to turn darts into an elastic waist, but not so easy to do the opposite. In 5 easy steps, here's how: (click on the photo to see a larger view)


That's it! You can use this same procedure for almost any fitted garment. Questions about that? just ask!

Friday, January 21, 2011

Making the Case for a Dress Form

I am not automatically a proponent for sewing gadgets. First, it has to prove its usefulness to me. Gadgets and tools cannot take the place of technique - like a good screw driver, it can make the job easier, but will never replace the need for practice and knowledge. The more expensive the tool, the more need for establishing its worthiness to my life and budget.

In making the case for a dress form, the best ones will cost hundreds to thousands of dollars, and the personal dress forms are a whole lot of trouble to make, so it's a decision that can't be made lightly.
I've draped a new design idea. Looks great!
First ask yourself, what will I use it for? Why do I want it? I use my dress form now in ways that I never needed before college. I use it to test a new design idea. Like at the fabric store, I drape my mannequin with a quick drape to see how the fabric and style idea will go together.

I had to drape the sash on this design I call Espire.
I use my mannequin during the pattern making stage to check things like the flare of the skirt, the gathering of a drape, or the depth of a neckline.

While I sew the new style together, I keep the garment and cut pieces pinned to the mannequin so that it's ever present in my mind and in my view. It's the designer "instinct" that can flag my conscience if something isn't working as expected. In this way I have a another chance to nix or improve a bad idea during this stage of the development.

If the style demands it, I need to use a mannequin to drape the pattern for part or portions of a new design style, as in the hip drape on this red dress I call Espire.


I consider a mannequin invaluable. I own two: one is a Styrofoam in size 6, and the other is my base size 10 in paper maché from dress rite. I use them both equally. But for all the things I do use them for, what you might notice is that I don't use a mannequin for fit. Why not? Because a dress form represents the body of everyone, yet no one. To check fit, I use a real person, a fit model. I talk about that in one of my earlier posts. To use a mannequin for fit, it would have to be a near perfect representation a real body, and even if it did match the measurements and body type I needed, it would still have limitations.

Many manufacturers have tried to produce mannequins that dress makers can use to help with fit. Probably one of the most common is the dial form. You are able to adjust the sides, bust, and back as necessary using the dials. I've never tried to use one of these, but it looks like guess work, and seems like it would be hard to duplicate bodies with a rounded shoulders, large abdomen, or a swayed back.
Another type of adjustable form is like the small Styrofoam form I have. It came with pads and a cover to keep the pads in place. No matter how I tried, I could not pad the form to match a real body, or lengthen the back waist enough. The shoulders are incredibly wide too. No chance of making those smaller.
Using paper tape
For Do-It-Yourselfers, it's popular these days to make a copy of your body by wrapping yourself very carefully in paper mailing tape or duct tape. The idea is that you wear a long t-shirt, knit dress, or garbage bag and have a buddy tape you up with a few layers from neck to hip. There are numerous posts from people who have tried this, so getting the directions isn't a problem using google. What is a problem is that the end result isn't very accurate, it's unpinnable, and they actually add inches to your figure that aren't there! I have tried both of these methods and was not very satisfied with either.

A more accurate method for do-it-yourselfers is to wrap yourself in a plaster cast (like a medical cast for a broken arm) and then fill the cured form with spray foam. Remove the cast, and voila! You have an actual body duplicate that will take a pin and can be marked with waist and seamlines. There are instructions on the internet from a company that sells kits and will do this for you if you want. Check out My Twin Dressform if you are interested. (NOTE: Even though I make this method sound really easy- it's not. Plaster hardens very fast, requires special cutting tools to remove, and can be dangerous to children who might want to play in it. When so encased in plaster, fainting is a real possibility. Please, do not take lightly using this method for making a dress form!)

Saving the best method for last, a very safe, and very accurate method to get yourself a body double is to sew yourself a princess seam moulage or french lining which is a fitted sloper or master pattern with no ease. Pad any suitable mannequin (smaller than your actual measurements) that you may have to fit the moulage. This method requires no long calculations, only a helper. I'm going to do this with my fit model next week, and will leave you with photos and instructions hereafter. Stay tuned!

These posts are now published.Click below to read Copy your Figure:
Part 1
Part 2
Part 3


Wednesday, December 30, 2009

Courage to go on...


I can't seem to get my last style, which I call Fantasia, off the draft table. I wanted to get it published in time for Christmas- even just before Christmas would have been okay. When I sent it to the grader several months ago, it came back with a lot of errors. The grader fixed them, but when making the last sample ( I make the pattern up again and again to make sure it's right), the pattern just didn't fit right and I couldn't figure out why. After checking it once more, I discovered that the seam allowance was omitted from the back shoulder. Any error, and that's never the end of it. In this case, the sleeve fit is also affected. I finally had to leave it until the holidays were done. Often I get bored of a project before I see the end of it, and this one is stretching my ability to persevere. The packaging has been ready, and now it's time for the home stretch. The tree is down and Christmas is packed away. It's time to start thinking about projects, styles, and plans for 2010 and I'm itching to get designing again. I have an idea in my head that will not go away, and that's a good sign.
Next week I begin teaching my 10 week class about clothing fit, so that's taking up a bit time. Details, details. I've just got to get back to my mannequin!