Showing posts with label sewing patterns. Show all posts

Monday, April 6, 2015

Pattern Tutorial: Ehlen Blouse Variation

 
Trying to match a brown and gold polka-dot shantung silk pant, I found a gold lining in my stash that was the perfect color. While a blouse could be made exclusively from lining, in my opinion it looks a little cheap. This fabric is very light weight, and exceptionally shiny, so to tone down the shine and give the look an upgrade, I decided to pair it with chiffon in a champagne color. The result was a really pretty dull/shine iridescence. 

To pull out this contrast even more, I bound the neck and sleeve peek-a-boo edges in bias strips made from the lining and also added in a sash that is sewn into the side seams. This soft and sweet blouse turned out to be super quick to make, and in fact, I sewed it together in one day.

This tie can be worn both wrapped and tied in the front, or to the back. I love this look with jeans; a sassy bow and long ties floating behind....


First things first, get your pattern here:
http://www.sewchicpatterns.com/ehlen.html


Then, to prep for this project, you’ll need an additional ½ yard of lining fabric for the binding and ties. Follow the same number to cut except for the sleeve band you'll need to cut 2 of chiffon, and 4 of lining, both front and back. You will also need to rearrange your lining layout to accommodate space for the bias strips. You'll need 2 strips cut on the bias about 1 ½” wide and about 30” long, or enough to go around the front and back neck edge. One will be for the neck and the other will be used for the sleeves. Don't cut anything to size until after it's sewn. The first ¼ yard of lining will be used for the ties. Cut 2 strips 8” wide the full length of the cross grain. 

Once the chiffon and lining are cut, layer the sheer over lining and pin all the way around, with pins no less than 2” apart. Baste around all pieces ½” from the raw edge. Prepare the binding by folding in half, raw edges together, press.  Because the binding will finish the edges, and the lining will be used as one with the sheer, be sure to include a seam finish as you sew each seam. With the exception of the sleeve band, no lining is used on the inside. We want to put this together fast!


The bodice will need to be sewn together in a little different order than your booklet outlines. Here is how I did it:

 Sew the bodice back darts, and front to side front, then sew the front to back at the shoulders.


Sew a stay stitch around the neck edge at 5/8”. Trim to  slightly less than 3/8”. I did this to keep the seam allowance/binding edge manageable, and make sure that my stitching won’t show once the neck is complete.
With wrong sides and raw edges together, pin binding to neck the first few inches just to hold it in place. With the binding towards you under the machine, sew a roughly 3/8” seam. Now I say roughly because my eye stays on the folded edge of the binding (and the distance from the presser foot) at all times. I want that binding edge to be an exact measurement all the way around the neck. In this case, the seam allowance is not my biggest concern.

 Sew again, about 1/16” inside the seam allowance. This is an extra precaution against raveling.

Trim the seam to 1/8” from that second stitching and clip the curves as usual.


      Press the binding and seam up, then press the binding down to the right side of the blouse, folding down right on that seam.
    Top stitch on the right side close to that fold. Scant is the word we use to describe this distance- which means it’s so close you can’t really measure it!


    Sew the center front seam from that symbol all the way up the front. If you’ve measured that binding distance correctly, those binding edges will match right up.Now finish the front and back with the midriff and peplum.


I made my ties using a typical vintage fold up method, but for this light weight fabric, I think it weighs the ends too much. I recommend that you cut the ends on the bias and then clean finish all three edges, which is to turn under 5/8" and then again 1/4" to the inside of allowance. Stitch close to that second fold.


Make sure your ties are finished so that they mirror each other.It's easy to mix up which is the right/left/wrong right side of the fabric.

     Sew two rows of basting stitches at 5/8” and 3/8” along the remaining short end.
  Pull bobbin threads to gather to half the width, about 3-4”.
With right sides together, pin tie to bodice front at side seams above waistline seam.
 Baste to the side seam. Now you are ready to install the zipper.
    The sleeve won’t be lined either. We’ll finish the edges with binding instead.


       As before, stay stitch, add binding to the front and back where the angular peek-a-boo  opening of the sleeve will be. Press to the front and top stitch. Now sew the sleeve front to sleeve back as usual.


Sew the sleeve band as guided by the booklet. I make a template from scrap paper, then use chalk or disappearing marker to create a sewing line to help me get a nice curve around that corner.

I finished my hem with a clean finish as well. It's quick and neat, and won't get in the way of the zipper. Let me know if you make this blouse! I would love to see your creations!

♥Laura


Saturday, November 3, 2012

Pattern Alterations after Fitting a Muslin

To test the fit of a pattern, sometimes it's wise to make a "muslin" or a sample of your pattern in inexpensive fabric. Cotton muslin is the least expensive of all fabrics, thus the name given to a garment made just for fitting. First make sure the pattern size you picked is right for your measurements. If not, check out my Pattern Resizing Tutorials, Part 1: Small to Large or Part 2: Large to Small. If you make a muslin to make sure your garment fits perfectly, you must also be able to transfer your fitting changes from fabric back to the paper. Here's how to do this, step by step:

1. After your fittings are complete, mark ALL seams, both changed and unchanged. I find that a fine tip permanent marker does a great job because one line down the seam marks both sides for me.

2. Remove all the stitches, darts, seams, everything.
3. Press all pieces flat.
4. Assuming that your pattern is  made of transparent paper, lay the paper pattern over the fabric piece. Match up the fabric seam lines that have not changed with your paper pattern seam lines.
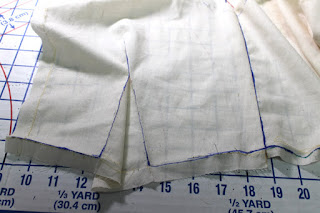
5. Here you can see the changes more clearly. The blue mark is the changes on the fabric while the pencil mark is the pattern original. If you are ever left wondering whether to make a change to the paper pattern, remember that the fabric marking always takes priority over the paper marking because the fabric has been tried and proven to fit.
 6. Now I need to mark the change with a colored pencil. This helps me to remember where I changed the pattern from the original. I can also keep the original mark to refer back to it if needed.
 Here is the change shown clearly.
 7. For seams, I must also correct and create a new cutting line. I blend my new line into the old line. You may also need to "true" corrected line. In other words, make sure that your new lines are smooth and straight (or nicely curved), and blended into your original line. I can also put slash marks through the original line to remind me that I don't want to use it. It's an extra assurance.
 That's it. Now your pattern is ready to use again!


Saturday, September 15, 2012

Sew a pattern without instructions


If there were no written instructions, would you be able to put a sewing pattern together? This question isn't meant as a quiz for the highly intelligent or for only the practiced seamstress. If you know what all the lines and markings on your pattern are for, your answer should be a resounding YES.These lines and symbols are a pattern makers way of telling you how to assemble the pattern with as few words as possible.  You've seen them many times; they lie upon the edges of the cutting line, seam lines, and inside the pattern itself.

Notches are marks found on the cutting line. What they look like will depend upon the program that is making the pattern. They can be triangles, filled or not, or look like clip marks. We use notches ONLY when the shape of a pattern pieces look like another, or if a piece could be easily turned around, or on long seams where stretching or easing could use some guidance.

Symbols come in various types (circles, squares, triangles, lines) and are for interior construction, such as pleats, gathers, ease, and so forth. A symbol usually has a matching partner, and that's why there are so many types. This way we can put circles to circles and squares to squares. Everything should match up perfectly, and sometimes we will add words to the pattern to tell you what that line is for!

I'll use the hip sash section of the Myrtlewood pattern to show you what I mean. Here are two pattern pieces that go together, Piece A and Piece B. One is laid on top of the other. You can't tell that right away, as they are both very different shapes. Pattern Piece A actually has a back piece to it, but we are working with the front half for this example.
On this piece A, you should see darts, notches, symbols, a slash line, and a bent arrow grain line which means you need to cut it out on the fold line, with the grain.

On piece B, you should see pleat fold and match lines, as well as the direction to fold the pleat, symbols, notches, and a diagonal arrow which means that this pattern piece should be cut on the true bias. Bias has the most stretch in the fabric, and if it isn't cut out with the right grain, the pattern piece will not stretch or lay properly.


Because these pieces are sewn together on top of each other, the trick is to identify what goes to where. It would be easy to get them mixed up, or one upside down perhaps.  It's like putting together a puzzle, and a good idea to figure out how it goes together before you start sewing. If something doesn't match up, it's your cue that you may not have it right.


Here is a view of the front of that pattern a bit larger.


Can you tell what goes to what?


In the next diagram, I've identified what goes to where. Center Front and Center Back notes let you know where the pattern matches in front and back.


Clearly paying close attention to your pattern pieces is essential but you also want the item to fit exactly. If you are working with a pattern that doesn't quite match your proportions, explore my Pattern Resizing Tutorials, Part 1: Small to Large or Part 2: Large to Small.

I challenge you to sew your next pattern together without written instructions. Did you get the messages that the pattern maker was sending you?


Sunday, September 2, 2012

Sew Chic Pattern Review in Threads Magazine

This week at the end of a phone order for the Phantom pattern, the caller says "You know Threads Magazine had a review of your pattern in this months issue." My voice brightens "You don't think I would MISS that do you?"  I knew the review was coming, but I didn't know what the review would say, or if it would be......left unprinted. The truth is I could very easy miss a review of another sort, if someone didn't mention it, so thank you to that customer who took the time to call in her order so she could tell me. How could she have known that inside my  mailbox last weekend was a huge manila envelope with this really spiffy folder:


Inside the folder was a letter congratulating me on the upcoming review, and along with two other sewing magazines published by Taunton, was the current Threads Magazine with a marker for a quick turn to the review: 


What? You say you'd like a closer look? Well, okay if you insist...


Not all reviews gets a photo of the outfit, so that was special too. I love to see the pattern come to life, and this ensemble is definitely modern chic. I love the wool they used for the pants. The review gives it a "challenging techniques" icon, probably because the jacket/shirt assembly is compatible with sheer fabrics. All but the center back, side, and armscye seams are enclosed. I used a serge on mine, but a french seam  would be top notch quality.
In this magazine was another bonus: Threads did an article on independent pattern companies. The caller hadn't read the article yet, but had noticed the Spin Skirt in the cover photo. It was truly an honor to be numbered among so many talented and skillful pattern makers.
 
 What did my family think? My son noticed his sister's face, barely visible in the corner, and exclaimed "Elise is famous!"

Ahhhh, trumped again. 

Please, if you write or see a review of one of  my patterns, do tell me about it. I wouldn't want to miss that!

Thursday, February 9, 2012

The Valentine Pattern

So today was a good day for me. Here it is, the week before Valentines Day and I met my deadline! Several months ago I decided to design something in the lingerie category with the goal of getting it off the press before February 14- and I did it! I named this design Valentine for this very reason. It's been posted to Etsy, and will soon be online at the Sew Chic site.

At first I had BIG plans. So many  different slip versions, camisoles, tap pants, bras...all swimming around in my head. But then reality always sets in and I have to scale back to fit my reality. (In my head, it's so quick and easy!).

You might say- what a slow poke! You had SEVERAL months! In my defense, I have to tell you that I don't work on just ONE thing at a time. I work on several designs, which are all at different stages of the process. Sometimes I have to set a project aside just to give some perspective and distance. When I come back to it, I either have forgotten what I meant to do(?), or I have more clarity (!) What can I say? I'm a perfectionist. If it's worth doing, it's worth doing right.

But I digress- so after some research I discovered that slip patterns are so very hard to come by, and those that are out there are rather basic in design. Us girls want to be frilly and pretty and feel like a beautiful woman underneath our outer shell! On second thought- do us girls even wear slips under our dresses? Well, I do. Whatever you do with your slip is YOUR business, and I'll leave it at that!

You do get two views with this pattern. Pictured here is view A. You can buy this pattern named after the holiday for love at:
http://www.etsy.com/listing/92622211/new-womens-lingerie-full-slip-sew-chic

or
http://www.sewchicpatterns.com/shop.html

Here are links to a few sources for highly recommended lingerie materials:

Lace Beauty on Etsy has gorgeous laces and trims of the wide widths that you'll be looking for.
 http://www.etsy.com/shop/Lacebeauty 
 Ebay seller Rolandah has very good quality 108 wide tricot- enough to make 2 slips from one length of fabric!
Ebay seller: Rolandah

You will see Needle Nook at many of the sewing expos and conferences too. Additionally they have bra kits, and are a great phone mail order source for those of you who like to talk to a real person!


Needle Nook Fabrics
2174 E Boulevard Plz
Wichita, Ks 67211
316-684-5989
www.ndlnookfab.blogspot.com