Showing posts with label ironing board. Show all posts

Friday, July 27, 2018

Custom Tabletop Ironing Board Cover Tutorial


Tabletop ironing boards are inexpensive and readily available in almost every craft or home supply store. The covers, however, can be problematic because they are hard to find or expensive to replace. When looking to find or replace a cover that will fit your board, your options may come down to buying a new board or making due with a cover that is far too big! Luckily, resizing an inexpensive standard cover (ours cost $5.95!) is a quick and and simple process, and you'll finally be able to relieve your designated ironing towel of its unconventional duty.

YOU WILL NEED:
      Ruler
      A purchased ironing board cover
      A cover-less tabletop ironing board
      Pins
      A match
      6 large safety pins
      A  shoelace (or any small sturdy cord)


Start by placing your board on top of the wrong side of your cover, keep it centered and towards the tapered part of both pieces. Remove the stitching on the casing that holds the pull cord just along the bottom end of the cover about 2" into the end your board.


Measure and mark two inches off the bottom edge of your board. Cut on the line drawn, rounding the corners in to match the shape of your board corners. Mark a seam allowance, matching the seam of the rest of your casing (~1/2").


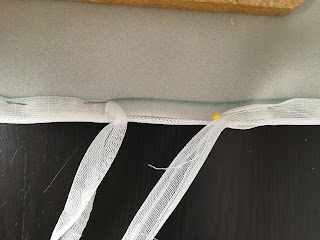
 Take the casing with cord inside and pin over the edge of the fabric, making both halves of the casing visible from both sides. Pin from each undone edge of the casing and pinch the excess at the center. Pull the cord up close to your fabric, you do not want to cut this!


Cut the excess casing, leaving enough for the ends to overlap. Pin this closed.


Pull the plastic cord tight. Cut off excess and, using a lit match, melt the tips of your cord to prevent unraveling.


Sew the casing as pinned, sewing close to the casing edge over the drawn seamline, reinforcing where the stitching meets.


Pull tight and check tautness. Tie the cord and flip to the underside of the cover to get it out of the way and prevent snagging.


If your cover remains slightly too loose, use the safety pins and shoelace or cord to thread and lace reinforcements across the bottom. To do that, attach the safety pins along the underside leaving about 1/2" visible from the right side, three on each side and evenly spaced. The placement need not be precise. Cross thread the shoe lace through the pins and tie the two ends of the cord together.


And you're finished! Enjoy the use of your new and removable ironing board cover!


Friday, July 27, 2012

How to make an ironing board cover


For a while I've been living with this REALLY nasty ironing board cover. It was so bad that I would not expose you to a photo...too embarrassing. Like mending, these tedious things sort of pile up on me because I don't really like doing them. Today I finally made a new cover, and it wasn't so bad. In fact, it was pretty easy, painless, and REALLY cost effective. My pad is still in perfect shape, but if yours is worn out, replace it with 100% cotton batting, at least 2 layers. It can be pieced also. Use cotton thread and a mending stitch. Here is a link to how to do it: http://www.sewchicpatterns.blogspot.com/2012/08/all-about-ironing-board-padding.html

I found a scrap of cotton fabric that had the look that said "I belong on an ironing board!" It wasn't quite long enough, so I pieced it at the end, turning the grain.You can see the seam at the right hand arrow.

Lay the rectangular fabric on the board. Trim the fabric leaving about 3" of  hang all the way around. It doesn't have to be perfect, so don't stress over this. I wasn't very careful, and you can see by the left side arrow that I left too much hang on that side. This will be a slight difficulty for me when it comes time to tighten the cover, but nothing impossible to deal with.

Next, sew a casing all the way around. I always do this by pressing under 5/8" from the raw edge and then press under again 1/4" inside the seam allowance. Top stitch close to the inside fold all the way around. You'll have to overlap fabric in tiny tucks around the curves. If you want it to look beautiful, do a basting stitch at the 1/4" fold and pull the thread to gather the fabric in before you stitch it down. For me, I don't care. This job doesn't have to look too pretty, it just needs to get done. Leave a 1/2" opening in the stitching somewhere.
My drawstring is going to be some nylon string that I have in my junk drawer. I need to thread this string through the casing all the way around the cover. A bodkin is a fancy tool invented to do this job, but as you can see, I've never used mine. I prefer a safety pin. I put a knot in the end of the string and then put the pin through the knot. I push the safety pin which leads the string, pulling it through the casing.


Lay the cover back on the board and pull the string until the cover is tight. Tie a knot or a double bow.


My cover is clean, white, lovely, and finished.Yay! I accomplished it. I should go do some ironing now...