Simplicity #1061 Sew Along

Monday, July 15, 2013

Rocky Mountain Sew Expo Vendor Review

Though I named my son Denver, it was not to honor the city I've not visited until now. I usually pack lighter than most vendors, but flying in for the show meant that I'd have to pack even less.
I kept telling everyone that I left the dancing girls at home, but what I really meant was that there would be no mannequins, displays, body forms, props or even extra clothing samples. 
Conscious of how much all this stuff would weigh (besides the airline limit, I had to lift and tow it all around!) I cut some pattern displays from foam board that served me very well. They were compact, light weight, easy to pack and assemble.


Together, DenverMart and Rusty Barns provided for, and treated their vendors very well. I had access to tables, risers, clothing racks, chairs, and waste baskets at no charge. There was a "break" room set up for vendors and every day was a fresh assortment of bagels and cream cheese, cookies, donuts, juice, water, coffee along with ice and a toaster to flavor, nourish and supply us during our hectic day. Everyone working for Rusy Barn Promotion group, including the owners, were friendly and hospitable.
With the show underway, I met many wonderful people. This group of Victorian/Edwardian ladies belong to a club (I forget the name!) that sews true to style clothing for any decade before 1940 and then they attend various venues together. Every town needs a club like this!
 My favorite vendor was Edie and Luc Roelens of Trims on Wheels. They have a little something (and priced) for everyone- high end and interesting to low cost basics. Positioned very close to my booth, it was an awful temptation. I managed to limit myself to 4 cuts of fabric, one rhinestone belt buckle and a brooch. They sell their trims online also, but the fabric you can buy only at some shows. See their show schedule online at  www.trimsonwheels.com
 This local vendor, Pam Cole of heavenly Threads sold kits for "Brazilian Dimensional Embroidery". It reminds me of the lovely handwork they did on dresses in the 1920's.


These shoes at Sue's Sparkler's are very cool! They make it possible to put sparkles on anything. Not that I would do it, but a great pair of shoes can't be missed.
www.suessparklers.com


This ribbon work by Helen Gibb Ribbonwork is especially lovely. Using any ribbon, wired or not, you can gather, pleat, embroider, and arrange ribbons to look like a bouquet of flowers. Many years ago my college professor put this ribbon work on a gown. Helen has written a book and put together an instructional DVD if you want to learn how to do it. www.helengibb.com

 The criteria for vending at this show was extremely loose. Besides real sewing and craft related stuff, there were vendors for pillows, massage chairs, shoes, makeup and jewelry, doll makers, and vacuum sales. Most of the jewelry by this vendor was hand made (though she doesn't want you to learn how to make it) with this set being a best seller at $50. www.victorianelegancejewelry.com

There was a high ratio of booths for various quilt and sewing guilds, the American Sewing Guild, Association for Sewing and Design Professionals, and other groups hoping to add new numbers to their ranks.

 At the shows end I pack up my gear and head across the parking lot. I see a single forlorn shoe. There is a mother out there with a frantic search in her future.

The sky is dark with a storm brewing. It's finally time to get out of Dodge. I mean Denver.

Sunday, July 7, 2013

Strapless Prom Dress Add-a-Sleeve Projects

One of the most popular patterns to print from my free patterns page is a sleeve that can be sewn to a strapless dress. Today I'm going to share with you the photos from a couple of girls that used this pattern to add a sleeve to their prom dresses.

This first beauty in black and white (one of my favorite combinations!) was sewn by Karli:
Isn't she gorgeous?!
Can't miss the back with all those buttons!


Zoe looks stunning in this bright and cheerful orange and yellow dress. She added pleats to her sleeve to mirror the side drape, and made a flower in the same contrast fabric and attached at the side:

 
We all know which guy was her date!

Great job girls! You look marvelous!

It's a great beginner project too. Get the sleeve pattern here:
http://www.sewchicpatterns.com/free.html

Tuesday, July 2, 2013

Matching Print Fabrics: Foolish or Wise?


If you read my last blog post about Southern Belle, it mentions that gingham does not have to be matched. Kathleen asks about matching fabric prints and whether there is a guideline - well yes - and no. RTW clothing often will not match anything- even plaids- because it's time consuming and expensive because it takes more fabric, but also wastes fabric. This is true even for home sewers, but being the masters of our own creativity, we can choose whether it will be worth it. Here are the guidelines:

The simple guideline is that SMALL prints, such as gingham, do not need to be matched. Any effort to match them will create more trouble than will ever be noticed. Small and busy prints blend together at the seams without planning.

LARGE prints, can be matched, and always looks nice, but will the extra effort pay off in terms of satisfaction? This is the question to ask yourself. Think about whether the clothing style is compatible. Simple styles with few seams are the easiest. Will the pattern repeat work with the clothing dimension so that the pattern can be matched on all angles, or where will the "off center" spots be?  It's a very mathematical proposition to match a print at every seam and can be the source of a big head ache!Your project could end up a wadder just out of frustration.

Geometric fabrics like STRIPES and PLAIDS must always be matched to look nice. If any part is off, it will be noticed right away.

Here's a great link to Sewaholic for a tutorial on how she's match a print- plaids and stripes are matched in a similar fashion. Though she's matched this first seam for us, you can be sure that the opposite side does not match up at all. Read all about it:

http://sewaholic.net/how-to-match-prints-along-seams/

Monday, July 1, 2013

Sewing Detail: Sew Chic Southern Belle LN8503

Summer is definitely here, and I love all the bright happy colors that come with the season. I was in JoAnn Fabric recently and noticed that their gingham taffeta is back on the fabric shelf, perfect for a summer version of Southern Belle. For your inspiration pleasure, here's the detailing that I put into mine:
I love gingham because it's easy to layout and cut with the grain, and unlike plaid, does not need to be matched. It's a classic fabric that has the look of sweet innocence, rivaled only by dotted swiss (wish I had some of that!). The only deviation from the pattern is a bias pin-tucked yoke and embroidery, adding some color for a contrast ribbon.
First, cut a rectangle on the bias a little wider and longer than the yoke pattern piece. Using a 1/4" double needle with white thread, sew every other stripe, all lengthwise stripes first, then switch to the crosswise. It creates a pretty criss cross texture.

Be sure mark the yoke pattern with a bias grain line and cut out the pattern piece. The pattern calls for a lining also, which gives structure to the yoke and ensures that this bias piece will not ever stretch out of shape. Cut the lining on grain as marked. Include interfacing as directed.
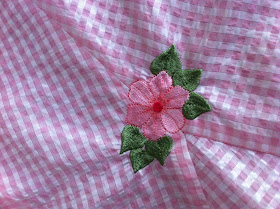
Since my placement was to be over the seam, I added the embroidery after the skirt was complete. I used a Viking design from 1998 called Fantasy, Card #30, Design #3, but any flower could look lovely. 

Add a silk flower in similar color and flower type at the waist/bow for a real vintage effect and a summer dress knock out!