For Sewing Indie Month my assignment was to pair up with Christine Haynes (patterns) who is also a Craftsy class teacher...
So I decided that my tutorial would combine our projects into ONE adorable outfit that YOU can make for yourself!
With a few quick pattern changes, I've turned Miss Sassy into a short jacket.
And Miss Flirty got a make over too.
I raised the neckline, changed the trim to mirror the collar on the jacket, added tucks down the front, highlighted by covered buttons.
I even added cross tucks to the pocket to continue the theme.
You can find the jacket tutorial here:
Sewing Indie with Craftsy: Flirty Meets Sassy, Part I
But stay right here for the Tia Dress tutorial, so here we go!
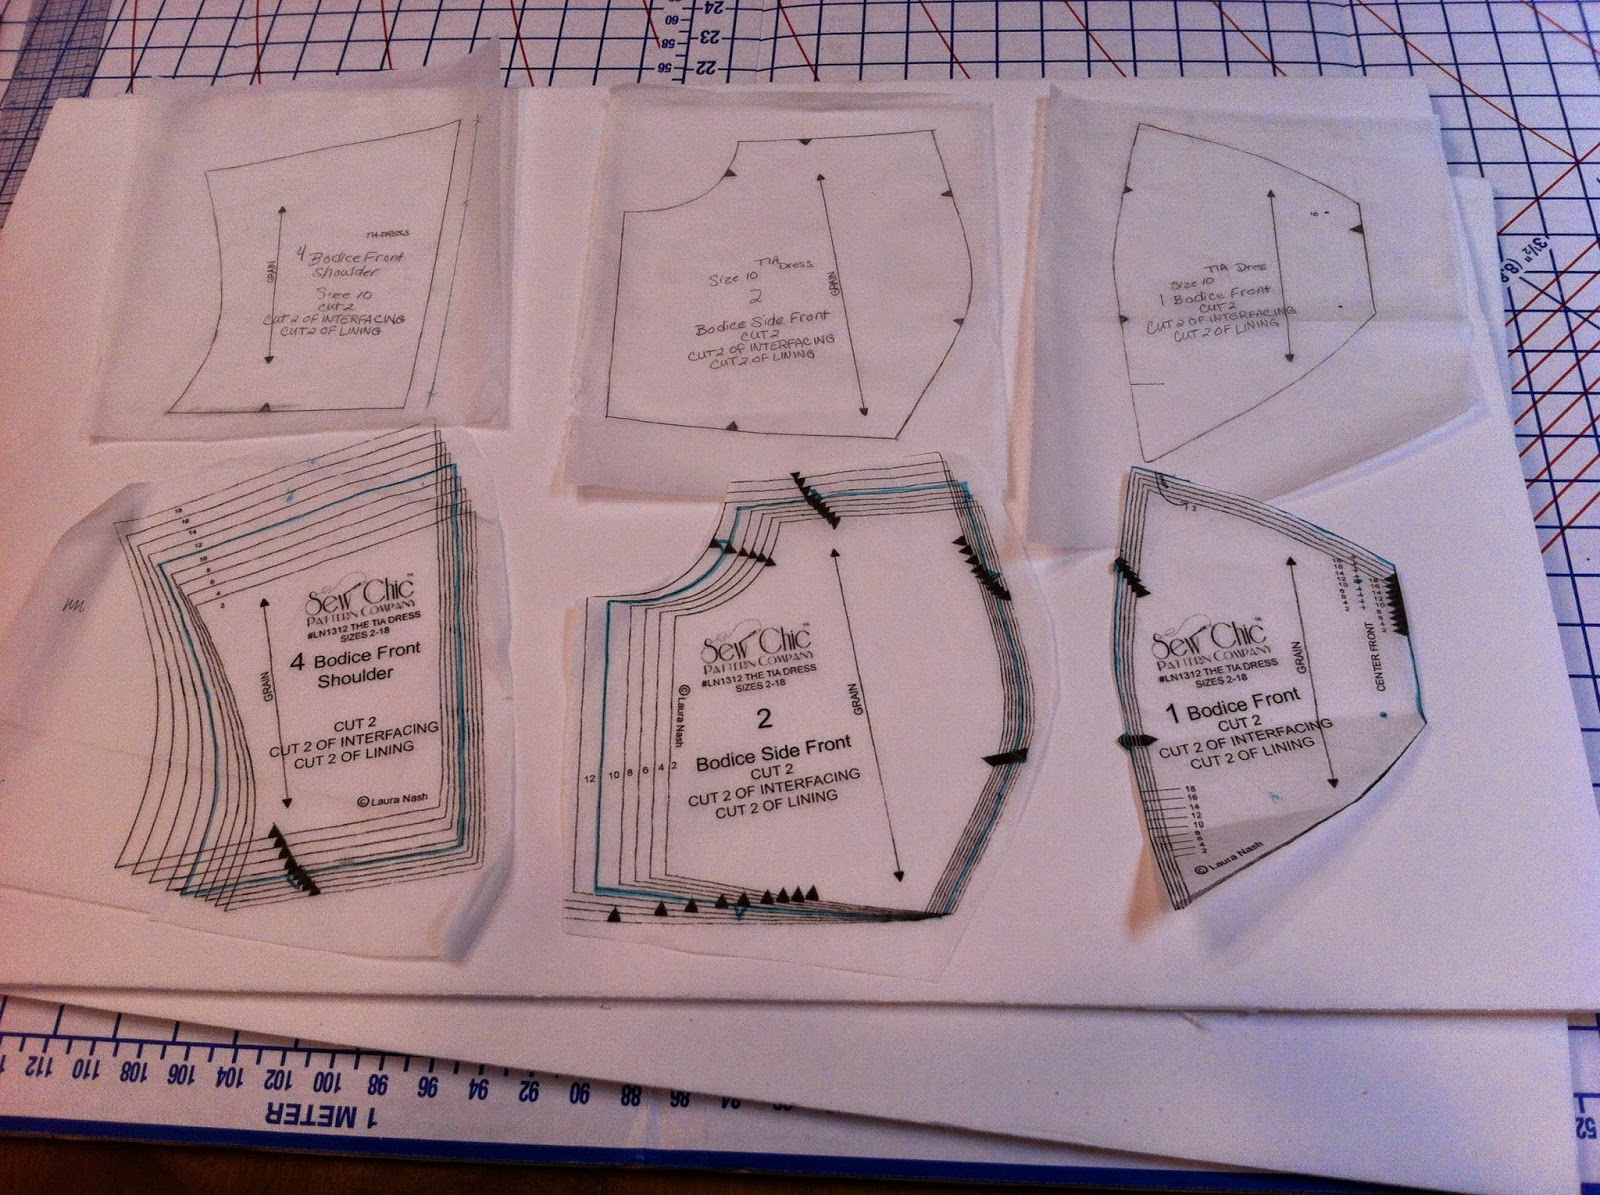
First we are going to raise the neckline. Whenever you want to make an alteration from the original pattern, I recommend that you first trace off the pattern piece in your size. If you make a mess of it, no problem. You can always come back to the original and try it again!
Here are my pieces traced off. Next, mark the seam allowances around the neckline. And pin them together as if sewn, leaving the bottom of the princess seam spread out.
Use a grid ruler to draw in a new cut line. I'm going to raise my neckline 5/8" and flattened that top curve just a little, raising the center to about 3/4". For more modesty, you can raise the neck more, and flatten the curve or go straight across for a square neckline.
What was the cut line, now becomes the sewing or seam line (easy for me!). I've extended the pattern cut lines for all pieces and shortened the shoulder piece to match with my new seam line.
This is what my new pattern pieces look like. Be sure to make a notation on your pattern so that you will remember what you did when you find this pattern again years from now! Next, I want to add pleats down the front at the same interval and depth as my
jacket pattern.
Rather than cut my pattern up to add the tucks permanently, I'm going to make the tucks first, then cut the pattern. This is a great way to add may kinds of details and get them positioned exactly. Using a small square of fabric large enough for my pattern and the wide enough for the tucks, I've marked the edges of my fabric with chalk so you can see it, but normally I would just make a clip with my scissors. These marks are 1 3/8" apart from each other. I've left
about 1 1/2 to the selvage. Be sure that your tuck marks follow the grain!
Fold the pleats along the marks and press. Your grain will keep these perfectly straight. Now sew your tucks at 3/8" from the fold line.
To keep these tucks straight, use a guide, not your eye, or a piece of tape. Cutting 2, one set of tucks will be pressed to the right right, and the other to the left.
Place the center front with the cut line 1" from the first row of stitches, or 1 3/8" from the first fold. Once sewn, that will leave you with 3/8" to the center front seam line. Don't forget to add the interfacing after your fabric is cut, just as the pattern instructions direct.
To add the trim, make yourself a pattern piece following the Craftsy class, or for those of you not in the class, here is what the pattern piece will look like with the measurements. Cut one, then cut in half, will be enough for both sides of the bodice.
Cut your trim, folded in half, and make sure that your end is square.
Sew the end and trim. Fold right side out. the pin designates the pattern marking on the front.
Matching the finished edge to that pin, pin, then baste into place.
Pin your center fronts together at the tuck seams so you know they will be the same distance from each other when sewn.
Also, before you sew, make sure that your trims match up perfectly at the beginning point. The X is where you'll put your needle down through all the layers.
Make your pocket in the same way, sewing the tucks first, then cutting the pattern. This one will be trickier than the bodice, because you'll be stitching those tucks on the bias. Be as careful as you can be!
Folding under your outside pocket seam will take some patience also. Use your bishops ruler to fold under and press, measuring from the pleat stitching, not necessarily from the pattern edge. No one will notice if your pockets are not exactly the same, but if your edge gets wide and narrow from your tuck, that will definitely be noticed!

Even if you aren't in the Miss Sassy class, I encourage you to read the part I tutorial anyway. I give you more tips for sewing perfectly aligned tucks!
http://christinehaynes.blogspot.com/2014/05/sewing-indie-with-craftsy-flirty-meets.html


What a lovely set and those details!Great work!
ReplyDeleteThe added details are perfect. The jacket is the perfect touch to this dress. Do you think this dress would look good without the trim at the bodice? I have bust issues from surgery and I do not like to draw attention to that are because I am lopsided. Love your patterns
ReplyDeleteBeautiful garments!
ReplyDelete